Lessons, Tips, and Resources for the Industrial and Gilded Age in United States History Since 1877.
This is the unit where students start to learn new information about United States History as most should have already taken U.S. History to 1877. I spend about 11 days on the content and two days reviewing and testing. Some teachers teach the Industrial Age and Gilded Age separately but it makes more sense to teach them as one unit together as they overlap at the exact same time and directly relate to one another.
I introduce the Industrial and Gilded Ages with a Gallery Walk/PowerPoint, you can purchase it by CLICKING HERE. Sometimes I use it as a PowerPoint to guide class discussions and at other times I use it as a Gallery Walk with the questions packet.
I start the unit by explaining what the Industrial and Gilded Ages are independently and how they overlap with each other. From here I introduce the factors that contributed to industrialization including the introduction of electricity to machinery and the invention of the light bulb in combination with economic factors like a free enterprise system and laissez-faire. It’s important to remind students about the Bessemer Process from the Westward Expansion unit and how it made steal faster to produce while also making it cheaper and stronger. The rapid expansion of the railroads and the building of skyscrapers would not have occurred without the Bessemer Process.
Business played an important role during the rise of industrialization and included the accomplishments of entrepreneurs. The growth of big business led to the abuse of both workers and their customers as well as corruption within politics.
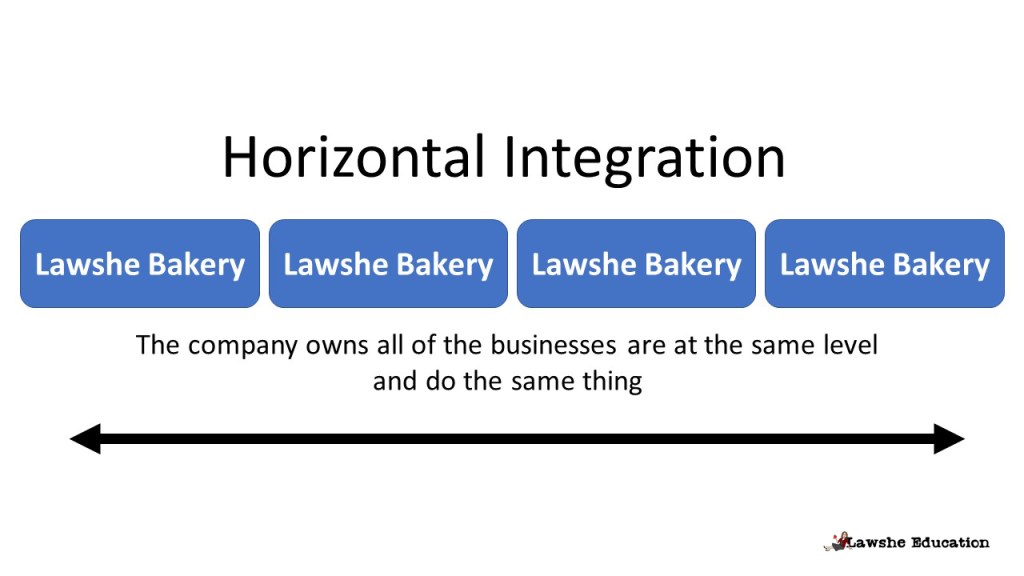
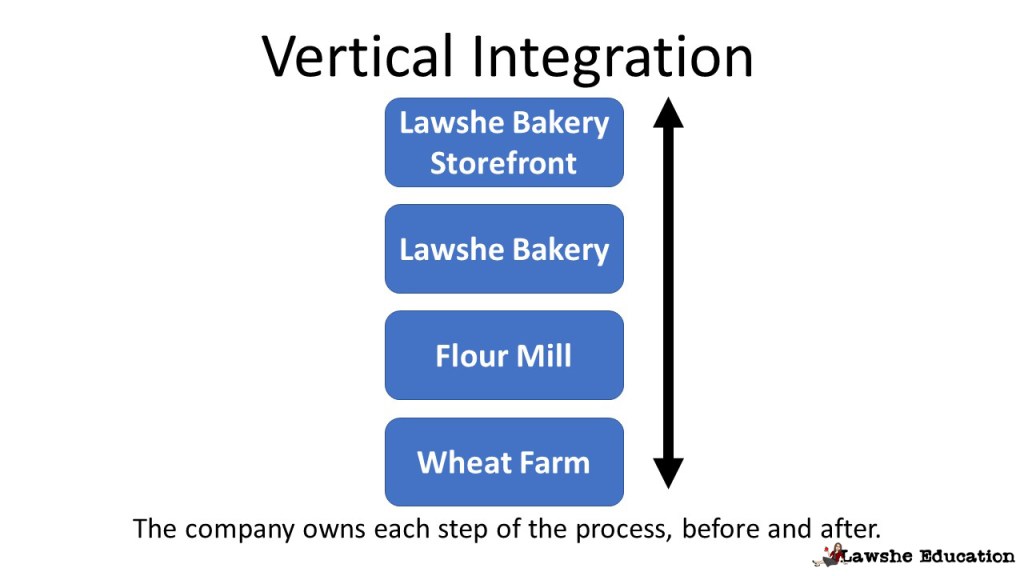
Students traditionally struggle with understanding the differences between verticle and horizontal integration. I draw out on the board examples of what they look like in a bakery format. See the images below. Feel free to download these images to use in your classroom but not for commercial use.
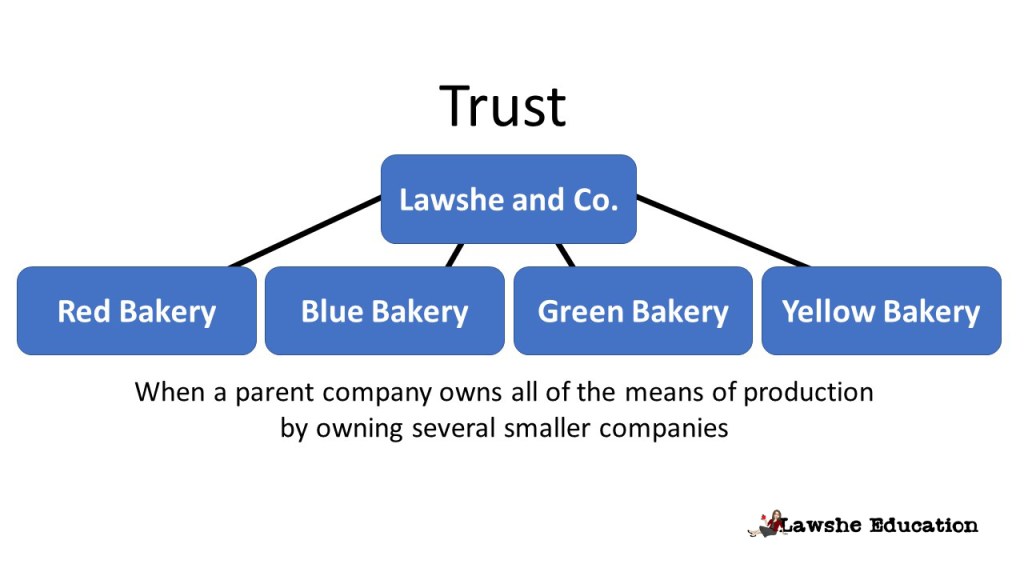
Trusts also tend to be a problem as well. This graphic should helps students to visualze how they are formed.
During the Industrial and Gilded Ages there was a huge influx of immigrants. Cities and local governments were unprepared to handle so many new people at once. Political Machines developed, tenement homes were built, and big business took advantage of the new immigrants.
Political Machines controlled local politics through Political Boses. Students often struggle to understand this concept. If you have time, I highly recommend showing clips of Far and Away as it shows how the Political Machines were run. CLICK HERE to purchase Far and Away. If you have time for the whole movie, that’s even better as it shows immigration, plight of the Irish, Political Machines, housing conditions, and even Westward Expansion. This movie is cram packed with U.S. History topics and students generally tend to enjoy it.
When you get to Tenement Homes be sure to show images taken by Jacob Riis. In general, just show any image from Jacob Riis during this era to help students visualize the working and living conditions of those in the cities. I always make a point to show the Jacob Riss image with the dead horse in the street and the children playing next to it. This image always evokes great classroom discussions about what was acceptable back then and what is acceptable today.
Make sure you cover all of the key players in terms of Captains of Industry and Robber Barons including Andrew Carnegie, Cornelious Vanderbilt, John D. Rockefeller, and J.P. Morgan. Explain how these men often used ruthless business tactics to build monopolies and later trusts. Some also practiced Philanthropy like Carnegie who wrote the Gospel of Wealth and built libraries all across the country.
Don’t forget to cover push and pull factors for why immigrants would want to come to the United States and leave everything they know behind. I list out the different factors like war, famine, political unrest, religious freedom, plenty of food, etc. However, I also take the time to explain that push factors are going to be negative things that are going to push people out of their countries. While pull factors are going to be positive things that are going to pull people away from their home countries and make them willing to take the risk to leave everything they know behind. This is also a good spot to explain the immigration centers located on Ellis, Angel, and Galveston Island. Be sure to mention the processes to be admitted through each and how Angel Island was much slower at processing immigrants especially those from Asia.
When the immigrants arrived many of them moved into ethnic neighborhoods and into tenement homes. Take some time to explain what ethnic neighborhoods are and try to give some examples. I live in Houston, and we certainly still have ethnic neighborhoods. When I ask students if they’ve ever been to China Town or Little Israel, many know exactly what I’m talking about. So use those modern-day examples if you’re in a big city to help students understand what ethnic neighborhoods are. This is a good place to note that the increase of immigrants in combination with unemployed farm laborers (because of advancements in farming technology required fewer farm hands) the cities grew at a rapid pace and increased urbanization. Explain the difference between rural and urban, you would be surprised how many students don’t know the difference.
Immigrants were abused by political machines and by big business. Many would work in sweatshop factories or in mines. They worked for long hours for little pay in dangerous conditions. Work injuries were common and there was no worker’s compensation like we have today. I explain to students what OSHA is and how it works to ensure that we have safe working enviornments today and that Worker’s Compensation will help cover wages if you’re injured. I remind students that these organizations were not around in the Industrial and Gilded Ages to protect workers.
Explain to the students the working conditions, pay, hours, etc. to the students. Since we have protections today that prevent these abuses, many struggle to understand truly how bad the factories and mines were. Show as many pictures as you can to them. Talk to them about children working, show them pictures of children working and standing on the machines. Explain that Child Labor would not be abolished untl WWII….
Since workers were being abused many joined labor unions. Students generally understand the concept that working together they have a larger voice to ask for improvements in working conditions and pay as a group than as a single individual. They struggle more with learning the individual strikes and organizations. Depending on how much your state requires them to know about this topic, you may want to spend a few extra minutes with the strikes and organizations.
As more and more immigrants arrived Nativism continued to grow. It is important for students to see the connection between Nativism and laws like the Chinese Exclusion Act. Both the Chinese and Irish were descriminated against and many companies often refused to hire them. As a result many Chinese and Irish would take the lowest paid and most labor intensive jobs, like building the Transcontinental Railroad. Students generally understand why the Chinese were discriminated against but struggle to understand why the Irish were. The Irish were mostly Catholic and the majority of Americans at the time were Protestant. Within the Protestant community there had been a long and deep rooted distrust of Catholics dating all the way back to the Wars of Religion and the Protestant Reformation. Long story short without going super in-depth into European History, Protestants were persecuted by Catholics and the Pope had a lot of influence over European monarchs. Protestants in the U.S. were concerned that the Pope might gain influence over their political system if more Catholics arrived. Hopefully that helps your students understand why the Irish became a target as well.
Since I usually have around 11 days to cover this material I have more time to do a variety of activities. Of Course, I do my favorite activity, the Industrial and Gilded Ages Picture Cards to review the unit and help with comprehension of vocabulary terms is what I call “Picture Cards.” This activity has been the biggest game-changer for my class. This resource helps everyone from many different levels including Sped and ELL. I created slides that I print out several to a page with groupings of pictures to represent the vocabulary terms for the unit. Then I created a worksheet with a word bank for students to reference. Each set of pictures represents a vocabulary term. Students must look at the context clues from within the images to determine which vocabulary term each set represents. Students absolutely love this activity and are excited when they see the cards on the desk, year after year this has not changed. I let the students discuss what they see with each other and what term they think each set represents. I want to hear what other people see and think, but I don’t just let them copy answers from each other. You can make this on your own, it does take some time. If you want to purchase my Industrial and Gilded Ages Picture Card set ready-made to go, Click Here to purchase.
This time period has so many different political cartoons that it makes it an awesome opportunity to introduce political cartoon analysis. I’ve tried a few different acronyms and methods. With my AP kids I used HIPP, Historical Context, Intended Audience, Purpose, and Point of View. These are great. However, I find that my on-level or regular academic along with my Sped and ELL tend to struggle with this one. I created my own called SLIDE, Symbols, Lables, Infer, Describe, and Era. For symbols I ask the students to look for anything within the political cartoon that represents something else like images of Uncle Sam or bottles on a table representing New Deal Remedies. Labels would be any writing including titles, initials, quotes, etc. I always ask students to infer last, but this is to determine what the political cartoon is trying to tell you. For describe I ask students to just tell me what they visually see, not what they think the political cartoon is saying but what they believe is occuring within the cartoon. Era is important, you would be surprised how often this is overlooked. I have noticed on our state EOC that the political cartoons always have answer choices from different eras, so if they can figure out the era they have an excellent chance of getting the answer correct. In general, placing the cartoon within an era is just good practice. When completing all of these steps to analyze political cartoons, students take the time to look at every little detail and will usually have a greater understanding of what the purpose or message of the political cartoon is. You can of course make your own, but if you’re interested in my Industrial and Gilded Age Political Cartoon Analysis CLICK HERE.
I also do a Fact or Fiction Activity. For this I cut red and green card stock into cards, you can purchase colored index cards that have red and green. I give each student a pair of each. I then put a PowerPoint up on the screen with a statement. I read the statement aloud and I ask the students if the statement is a fact or if it’s fiction. They hold up the green card for fact and red for fiction, this helps to quickly glance around the room to see who understands the concept correctly. Once I click on the slide a second time, a statement appears saying if it’s a fact or if it’s fiction. If it’s fiction, the statement is corrected with the parts changed to make it correct colored green so students can see where they made mistakes. This is a fun and easy class activity to review at the end of the unit. I have an Industrial and Gilded Age Fact or Fiction Review for purchase by CLICKING HERE. You can of course make your own as well.
If I don’t use the Gallery Walk/PowerPoint as a Gallery Walk, I do a Vocab Walk activity for this period. With this activity I created slides I could print out and hang up around the room. On the top is a definition and the bottom is a term. Students can pick any slide and start there. They read the term and then look for the hanging slide with the correct definition. When they find that card, they write down the next term on their worksheet. They repeat this process until the last definition takes them back to the first term they started with. Students can start at any point in the room, making it easy to space out and have students not all in the same place at once. This is a great activity to get students up and moving as well as talking to each other about the definitions for different terms. You can make your own, but if you want to save time I have an Industrial and Gilded Age Vocab Walk available for purchase by CLICKING HERE.
Depending on if time allows, I also have an Industrial and Gilded Age Jeopardy Game that I made in PowerPoint. Every time I’ve played this game the students have been engaged and have fun reviewing. If you’re interested in purchasing this resource, CLICK HERE.
Another great activity that I have is a Graphic Organizer that I made. On the front there are categories for students with boxes. On the back is a list of terms and phrases. Students are to place each of the terms and phrases in the box they are associated with. This is a great activity for students to make associations. I also have it for FREE in my Teachers Pay Teachers Store, CLICK HERE to access it. If you download and use this free resource please remember to leave a review.
Did you find any of these tips helpful? If so, subscribe to my email list. You will have access to tips, lessons, new resource announcements, and of course FREEBIES! I promise to respect your time and your inbox. CLICK HERE to SUBSCRIBE and join the Lawshe Education Community