Hi Everyone!
I wasn’t planning on posting blogs to this site. However, I know that this is an important one to share with everyone. Recently I started Graduate School (Yay! and Yikes!). Classes began in the middle of the Spring Semester last school year, and I did fairly well keeping up with everything between work and school. I’m actually about to wrap up my first session in a few weeks. I was teaching two classes that I had taught the year before and despite starting graduate school a few weeks before our testing season began I managed to make straight A’s in the class. I was using a regular planner that I had purchased for the sole purpose of scheduling grad school work. That worked well for the time being.
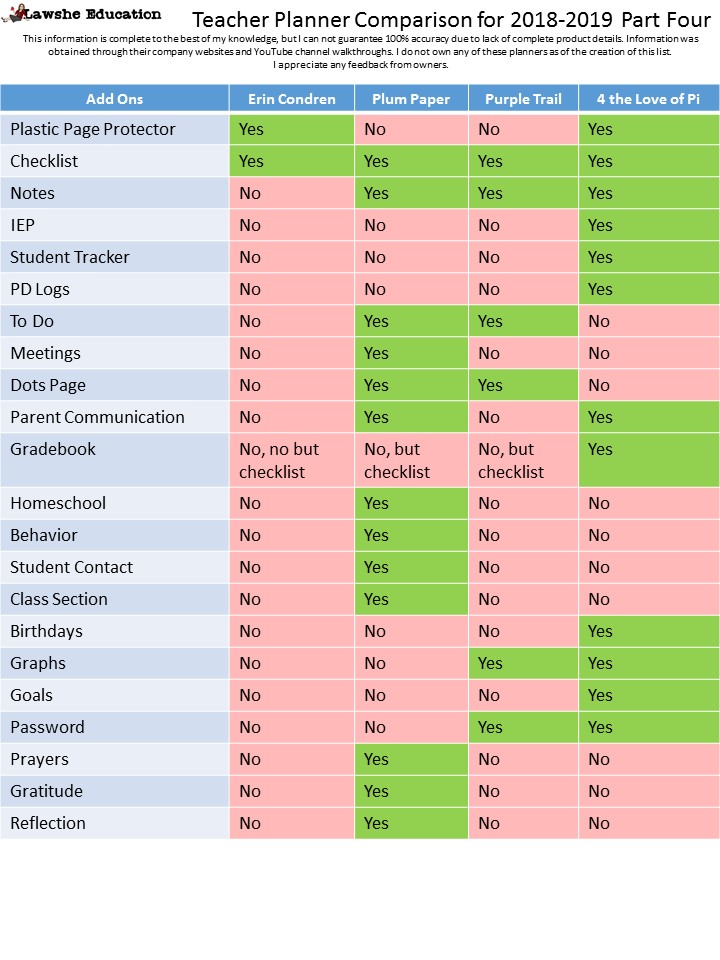
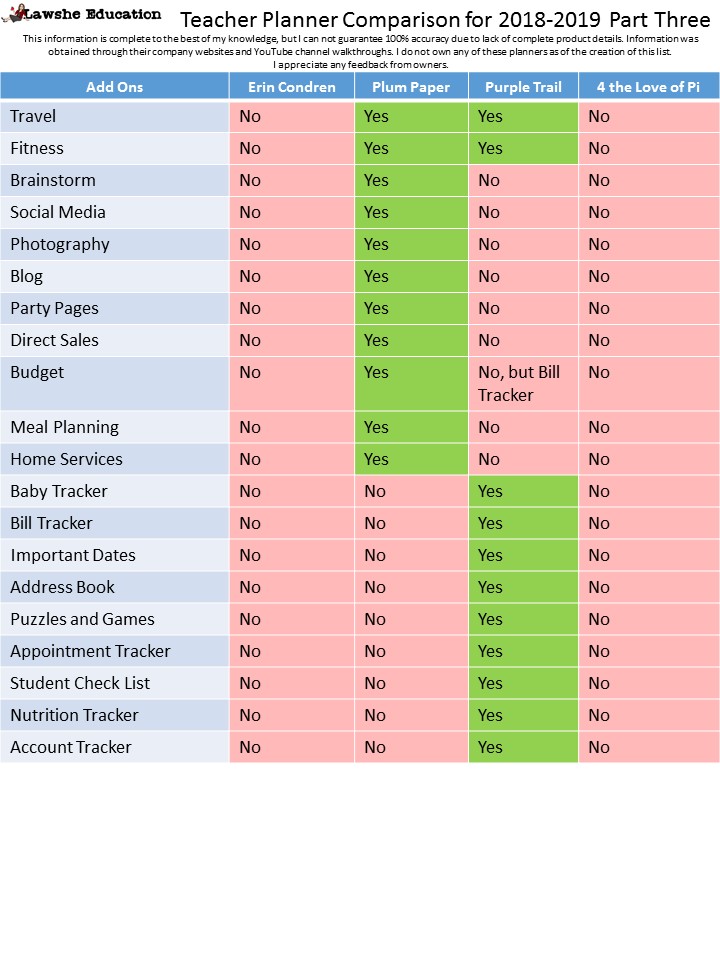
Before I left school a few weeks ago, I was told that I was having another AP class added onto my course-load. I haven’t taught this one before, even though I’ve been certified to teach it for years. This means that next year I will be teaching two different AP history classes and an academic or on level history class. Even though I plan, a lot, I have never had an official teacher planner. In my district, we upload our lesson plans online. As these are not easy to access on a daily basis I lay out the plan for my classes on a printed calendar that I taped to my cabinet. I would throw it away and start fresh the next month. This system has worked well for me in the past, but I don’t feel that it will work this next year with teaching three different tested preps. Plus, as I threw them away, I don’t have a running record of what we did for each unit. Yes, I have my online lesson plan submissions, but as we all know plans change (and they change a lot as the needs of the students change). I would like to have a permanent record of the last minute changes with notes of what worked and what didn’t work. I decided that the best way to do this is to purchase a teacher planner. My biggest problem was that the “big” planners had so many different options and each was unique in their own way that I literally couldn’t wrap my head around it. I spent at least a day browsing their websites and watching YouTube videos about the various teacher planners on the market. Finally, I decided I had to make a chart (and I do love charts). Below you will find four charts. The first two show what is offered by the four major teacher planners (Erin Condren, Plum Paper, Purple Trail, and Four the Love of Pi). The second two charts show the various add-ons.
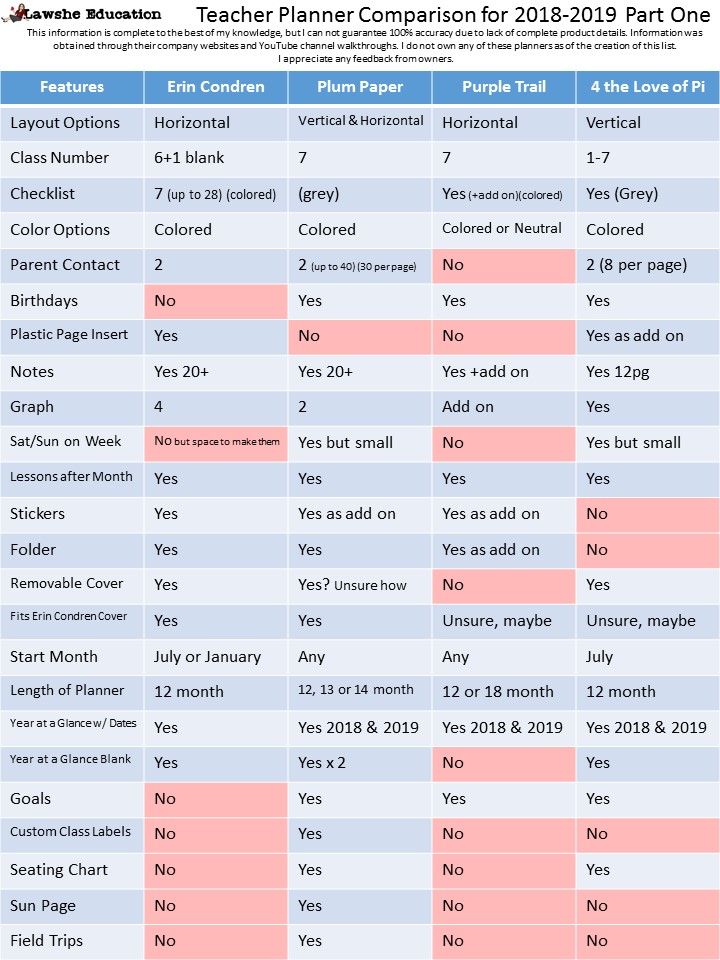
Erin Condren, Plum Paper, Purple Trail, Four the Love of Pi Teacher Planner Comparison Lawshe Education

Erin Condren, Plum Paper, Purple Trail, Four the Love of Pi Teacher Planner Comparison Lawshe Education
Erin Condren, Plum Paper, Purple Trail, Four the Love of Pi Teacher Planner Comparison Lawshe Education
Erin Condren, Plum Paper, Purple Trail, Four the Love of Pi Teacher Planner Comparison Lawshe Education
Yes, that’s a lot of information! It’s also precisely why I had to chart it out because I couldn’t wrap my brain around it. These planners are pricey, and I needed one to use for both lesson planning and grad school to ensure that I keep up with everything that I need for this upcoming school year. I needed to make a well-educated decision about which one I would choose to purchase. As a result, I’ve presented you with as accurate as possible a complete comparison of the “Big” four teacher planners made by Erin Condren, Plum Paper, Purple Trail, and Four the Love of Pi. None of the sites provided 100% product detail for these planners. I gained the information above from their websites (listed below) and from YouTube reviewers. When I made the chart, I did not own any of the planners. If you own one and see a mistake above, please let me know. I would really like to ensure that these charts are accurate. Below you will find what I liked and disliked about each planner as presented by the company’s websites and YouTubers.
I have to say that I love love love the Erin Condren Teacher Planner covers and the coloring of their pages. I really liked the colored checklist pages. I’m not sure if I would ever use them, but they were just so pretty. I can maybe see utilizing a checklist to make a list of accommodations without any identifying information to who the student is as this is very sensitive information. If I did this even without identifying information, I would still be required to keep it locked in a cabinet so I’m not sure if I would use it for that. I would like to keep this out on my desk and with sensitive information in it, I won’t be able to do that. The covers come in a variety of patterns and you can customize it with your name. I also like that fact that they’re interchangeable. I thought that it was inventive to include page protectors as an option. I immediately thought about putting my district calendar in one. I later thought about it and realized that I could recreate my district calendar on one of the At a Glance pages that shows the whole year. A lot of complaints from YouTubers about the Erin Condren was that the lesson plans were at the back of the book and did not follow the monthly spread. As of the 2018-2019 Teacher Planner, they have corrected this issue. I really wish that it included a Saturday and Sunday on the weekly spread. I know that there’s this running theory that teachers never work on the weekends but that’s not true for everyone, and I want to include grad school work on here too. There is, however, a space that you can create a Saturday and Sunday by hand. I liked the coil color options, and this is the only one of the big four that I saw had this option. As far as add-ons and other options Erin Condren is very limited. You can add your name, page protectors, and checklist pages. If they had parent contact sheets as add-ons this would’ve sold me on the Erin Condren Planner. I almost ordered it, I even had one assembled and placed in a cart. I had my credit card out, but I decided to make my charts shown above first. Wrapping up Erin Condren, for the overall lesson plan layout usefulness, I would grade it a 7/10. A+++ for Covers and Colors and F for add-ons. This is sad, I wanted to love Erin Condren so much! I do like that they have planner accessories and snap-ins.
The Plum Paper Teacher Planner is the one that I chose. What sold me on this planner was the add-ons, something that if Erin Condren had would’ve sold me on them. Plum Paper offers both horizontal and verticle planners. I chose the “horizontal,” but this would be a verticle for Erin Condren. Erin Condren the classes go across the top in their horizontal layout and Plum Paper’s horizontal design the classes go down the side. One YouTuber made a good point that with the Erin Condren Planners you would have to keep both sides open, with the classes running down the side instead of the top you have one whole day on one page and can fold the planner in half. Desk space is a commodity, so this was an essential factor in choosing Plum Paper. I think I could’ve dealt with the Erin Condren layout if needed. The checklists for Plum Paper are grey. This made me a little sad, I loved the rainbow colors on the Erin Condren. However, the checklists were not the top selling point for me, so that was ok. The Plum Paper weekly layout does include a Saturday and Sunday, but they’re tiny. I would like to see some of the space below them used for these two days in future redesigns. The Plum Paper covers are supposedly removable although I’m not sure how without damaging them. This might be new to the 2018-2019 teacher planner. The Erin Condren covers do fit the Plum Paper planners, but the tabs hang out the side a little. I was not overly in love with any of the Plum Paper Covers. However, they did have a large selection, and you can print your name on them. I could be a little biased on this one as I had previously fallen in love with an Erin Condren cover. There are so many add-ons with the Plum Paper Teacher Planner. I’m not going to list them all here as they’re in the charts above. However, I was sold on the Meeting and Communication Pages. I loved the layout of the meeting pages, space for notes and more. The communication pages had 34 lines per page! I teach high school, and I am required to make contact up to a minimum of 12 times a year per student, I need that space! The downside is that you can only add on 40 additional pages. I wish that I could’ve added more. If that were an option, I would’ve added the Social Media section, reflection pages, behavior logs, and notes. I chose to use the additional page spaces for the parent communication necessity, as this is the main reason I did not select Erin Condren. I liked that Professional Development and Expenses were included automatically. By far, Plum Paper offered the most customization, including names on the covers. They had so many options for add-ons that I didn’t have space for all that I wanted, that’s a good problem to have. They also offer to print your classes onto your planner (for an additional $4 fee). This is a steal considering that I was looking at custom class stickers on Etsy.com that would’ve cost around $40 to fill in the whole planner. I chose this option to print in my classes. I had room to have a Before School, Planning, US History, APUSH, AP Euro, After School, and Grad School section on the weekly layout. I will be able to track all of my meetings, tutoring, lessons, and grad school work all in one place (heaven!). Wrapping up Plum Paper, for the overall lesson plan layout usefulness, I would grade it a 9/10 (took a hit on the Saturday and Sunday layout). A- for Covers and Colors and A+++for add-ons. I am very excited to receive my Plum Paper Teacher Planner in a few weeks! (Side note I ordered this planner on 6/26. As I was typing this blog it shipped on 6/27!)
I was a little more than disappointed in the Purple Trail Planners. Of all of the things that I was looking for in a planner, they lacked the necessities. I needed parent contact pages. I did not see a year at a glance page either. As far as I could tell with my extensive research, they don’t have either of these. If you own this planner and I’m wrong, please let me know. I will update this blog post. Their covers were pretty, and there were several that I loved, a lot more than the one I chose from Plum Paper. Seriously, their covers are gorgeous. I also like that they offer different bindings including hardcovers, spiral with either laminated or plastic covers. They only offer one layout, horizontal (like the Erin Condren Planner). I wish that they offered a verticle option. There was also once again, no Saturday or Sunday. The checklists were in rainbow colors, so pretty! Overall I was not impressed by the inside of this planner. Please see the charts above to see what is included and what is not included. They offer a limited number of add-ons. You can choose up to 4, but most are geared towards personal planners and not teacher planners. They offer more than Erin Condren does for add-ons so that’s a plus. I can see with a little revamping on the interior that this brand could eventually rival Plum Paper regarding functionality. Wrapping up Purple Trail, for the overall lesson plan layout usefulness, I would grade it a 5/10. A+++ for Covers and Colors and B- for add-ons.
Four the Love of Pi is an Etsy store. Again this is one that I wanted to love. The online reviews were excellent and the covers are beautiful. One YouTuber said that it is evident that a teacher had put input into the planner (sorry I watched so many videos, I can’t remember who it was). I agree with this person. Clearly, there were things in the planner that only a teacher would think about like IEPS and Accommodations. The problem is that this information is confidential. You can’t leave this information lying around, and you definitely can’t leave it out for a sub to look through (more on this in a minute). I would prefer IEPS and Accommodation pages to be add-ons and not take up space where other more useful pages could go. They do not offer substitutions. While I completely understand this policy as a point to ensure consistency and quality, from an Etsy store I wish that this option could be offered as they’re handmade. Four the Love of Pi does offer a Special Education Package as an add-on. If you’re a Sped Teacher and can keep this planner secure at all times, this might be an excellent option for you. I liked the fact that they offered a lot of add-ons for items. However, most were for what they included in their planner already. I did not like the fact that the parent contact page only had space for 8 total contacts (16 front and back). Plum Paper had space for 34 per page (68 front and back). As a secondary teacher, I need need need space for logging parent contact. In the past, this is something that I kept separate. Once I learned that you could have it in a planner, it was a must-have for me. The lack of parent contact spaces in total compared to Plum Paper and the missing Meeting pages sold me on Plum Paper instead. I really liked the covers, again more than Plum Paper. In the long-run, it’s the usefulness and what’s on the inside that counts. The covers were gorgeous, I’m curious if they would fit on a Plum Paper Planner. You can, of course, customize the cover with your name. The layout is horizontal for one class and verticle for the others. I liked the fact that you could choose between 1-7 classes in your layouts. This is a nice personalization tough. Wrapping up For the Love of Pi overall lesson plan layout usefulness, I would grade it a 7/10. A+ for Covers and Colors and B+ for add-ons.
There are a couple of things that I wanted to talk about before wrapping up this blog post. There were several pages included in multiple planners above (see charts for specifics) that could cause security issues. Sub pages, while they seem helpful are useless. I don’t know about you, but I would never leave my planner for a sub to have access to. Even though I’ve had some excellent subs, I’ve also had some that well let’s say I’m glad my kids survived! I would like to see a separate sub planner or folder. Password pages, this seems like a good idea. That is until someone who shouldn’t see it sees it and now has access to all of your accounts and passwords. If you’re going to use the password page write your username but write a hint that only you would know the answer to instead of writing your actual password. I can only imagine grade changes, twitter posts, emails, etc…. being done without your permission or knowledge (yikes!). While I think it is somewhat of a good idea to include IEPs and Accommodations in a planner, at the same time, it’s just not safe. You would have to keep this locked up and would defeat the purpose of having a planner. Could you imagine leaving it somewhere and the wrong hands getting a hold of it (again Yikes!)? I would like to see a separate planner or journal to log these. Special education paperwork can be cumbersome. Personally, I do keep a record outside of this paperwork. It is however protected and locked up.
Are you tired of reading? That was a lot of information! Now that you’ve seen my thought process, it may explain why I needed to make charts to wrap my brain around all of the different options. I hope that this blog post and my charts helped you to make a decision if you’re in the market for a new “Big” teacher planner. I know that they’re not for everyone, and not everyone wants to fork over that kind of dough. I was hesitant at first too, but I feel that the one that I chose will help me beyond the financial investment that I made in purchasing it. One thing that I left off is the base price before shipping, add-ons, etc… Erin Condren Teacher Planners start at $55-60, Plum Paper Teacher Planners begin at $42, Purple Trail Teacher Planners start at $48.95, and Four Life of Pi Planners begin at $49.99. All of these planners are 8×11 inches. For reference, after the add-ons but before shipping my Plum Paper Teacher Planner came out to $56.50.
Happy Planning!
As promised below are the links to the big four teacher planner websites.
Erin Condren: Full Disclosure, the link below for Erin Condren, is a referral link. It will provide you with a $10 discount off $30 if you’re a first-time purchaser. I will also receive a $10 credit.
https://www.erincondren.com/referral/invite/amberlawshe0905
Plum Paper: I can send a referral email to you. E-mail me at alawshe@yahoo.com, and I will send one to you. This code will give you 10% off your first purchase over $30. I will also receive a $10 credit.
https://www.plumpaper.com/
Purple Trail: Full Disclosure, the link below for Purple Trail, is a referral link. It will provide you with a $10 discount off $50 if you’re a first-time purchaser. I will also receive a $10 credit.
https://www.purpletrail.com?ptref=9ad4d9b4eab8
4 the Love of Pi: Sorry no discount code or referral link, but you should still check them out.
https://www.etsy.com/shop/4TheLoveofPi?ref=l2-shopheader-name